Hi guys, I would like to share my budget dry cabinet build and provide information to some of you all who might want to build one as well.
Having recently returned overseas for good, I realised how destructive the local humidity is to our guitars. For example, unlike dry countries where I need only change my strings once a year, in Singapore my strings would tarnish within a week (Sweaty Palms). Furthermore, the Martin D28 which I recently purchased and left in the case for 3 weeks had become pregnant! Closer inspection revealed a constant 75% humidity in the case! Therefore always keeping it locked in the case does not help.

Pic. 1
I then placed these water jumbos (Fig. 1) from NTUC in the case with the guitar (2 in the sound hole, 3 in the case), successfully bringing the humidity to a constant 45% and the top came down. (We are lucky that the signs for high humidity in most cases can be reversed) But less than 2 weeks later, the 5 sachets had turned to gel and had to be replaced! Important to note that one would have to keep track of the humidity in the case as my humidity went down to 35% in the sound hole when I had 2 sachets in there. They cost 5 dollars for a pack of 5 which may seem reasonable but are a hassle to keep changing and monitoring. Therefore I started designing a dry cabinet for my guitars, one in which I could display them as well.
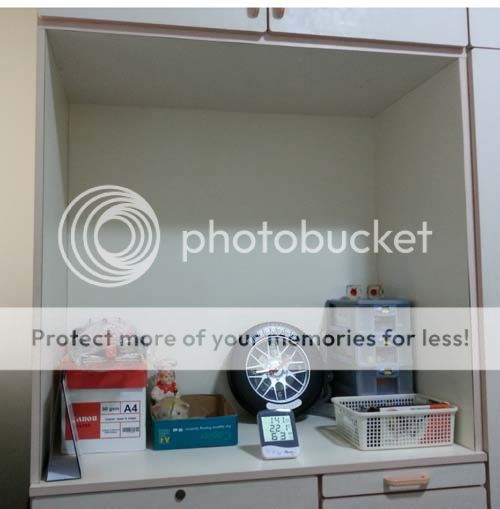
Recently moved into a rental place with a fugly cabinet and a desk too small for even a primary 1 kid (Pic. 2). I was pleased to discover it could just nice fit my Martin dreadnaught sideways. It can be seen, even with the air conditioner on, the humidity was still 63 percent, too wet for a Martin.
Pic. 2
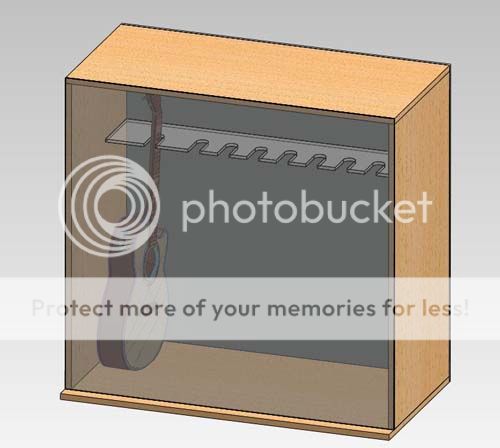
Therefore, the idea is to place the guitars in there, seal the front and control the humidity of the small space (Pic. 3). Initially thought of fabricating class doors with hinges but discovered it was way too expensive. A much cheaper alternative was to use a large piece of clear acrylic with Velcro tape to hold it in place. The Velcro also provided an adequate seal to prevent outside air from entering the area. (Turning off dehumidifier, takes 4-5 hrs for humidity to equalise with outside air) The neck slots were basically slots cut into a flat acrylic sheet. A folded Ikea fleece blanket was perfect for the guitars to sit on and cost only $5 (Pic. 4).
Pic. 3

Pic. 4
Choice of Dehumidifier:
Now that the cabinet is sealed, I proceeded with the humidity control. I tried the smallest dehumidifier I could find from Courts. It is a 230w dehumidifiers with a compressor (Pic 5). Big mistake. Although the unit could bring the humidity down to as low as 40% in less than 5 mins, the temperature inside rocketed past 36 degrees! Furthermore, once the target humidity is reached, the unit shuts down and humidity flew to upwards of 75%! This I realised was due to the big condenser fins which still had lots of residue condensed water left on it that would then evaporate back into the air. High temperatures, fluctuating humidity and a 230w electricity bill is a big no no. Thanks to courts return policy, I was able to bring it back for a full refund.
Pic. 5
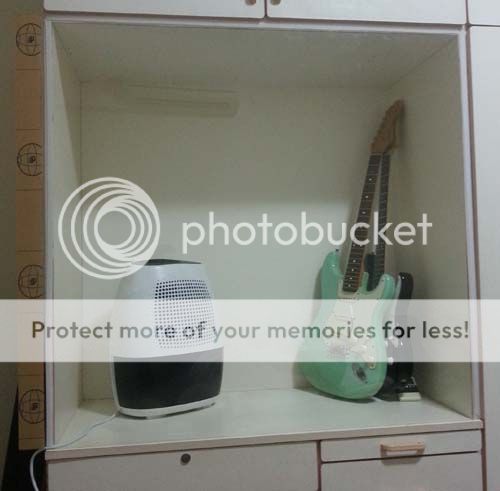
What I found next after some research is the Peltier effect type of dehumidifier. Though small and less efficient than conventional compressor dehumidifiers, it was perfect for small enclosed spaces. This particular “petite dehumidifier” (Pic.6) can be bought from Homefix for $99 or from the agent for slightly less. With a 23w power consumption, it will cost less than $20 to run it 24hrs for a month. It is near silent and keeps the humidity in the cabinet between 47-51%. Temperature never exceeds 31 degrees as well. Trying to save more electricity, I used an electricity timer to on and off the unit in 1 hr intervals and was still able to control the humidity between 49-51%. In other words the unit now runs 12 hrs a day. Was thinking my last resort was to put 6 x Hippos in there, but never had a chance to test it that works.

Pic. 6
It’s been a month and my strings are still in near new condition and my acoustics seem to sound much better than when they were wet. Im pretty pleased with this current setup now. Pic. 4 is how it looks right now.
Only problem left is the neck slots are kind of sharp and might scratch the necks in the long run. Does anybody know where I could get rubber or silicon tubes I could place around the slots??
The breakdown of costs is as follows:
Acrylic cover - $65
Slots - $70 (Couldn’t find a place that does it in SG, went Malaysia, think I got cheated)
Fleece Blanket - $5
Dehumidifier - $99 (At Homefix)
Hygrometer - $25
About $250, not bad to keep 9 guitars in an always playable condition.
Let me know what you guys think, and feel free to ask me questions and criticise my work.
Thanks for looking,
Leon
Having recently returned overseas for good, I realised how destructive the local humidity is to our guitars. For example, unlike dry countries where I need only change my strings once a year, in Singapore my strings would tarnish within a week (Sweaty Palms). Furthermore, the Martin D28 which I recently purchased and left in the case for 3 weeks had become pregnant! Closer inspection revealed a constant 75% humidity in the case! Therefore always keeping it locked in the case does not help.
Pic. 1
I then placed these water jumbos (Fig. 1) from NTUC in the case with the guitar (2 in the sound hole, 3 in the case), successfully bringing the humidity to a constant 45% and the top came down. (We are lucky that the signs for high humidity in most cases can be reversed) But less than 2 weeks later, the 5 sachets had turned to gel and had to be replaced! Important to note that one would have to keep track of the humidity in the case as my humidity went down to 35% in the sound hole when I had 2 sachets in there. They cost 5 dollars for a pack of 5 which may seem reasonable but are a hassle to keep changing and monitoring. Therefore I started designing a dry cabinet for my guitars, one in which I could display them as well.
Recently moved into a rental place with a fugly cabinet and a desk too small for even a primary 1 kid (Pic. 2). I was pleased to discover it could just nice fit my Martin dreadnaught sideways. It can be seen, even with the air conditioner on, the humidity was still 63 percent, too wet for a Martin.
Pic. 2
Therefore, the idea is to place the guitars in there, seal the front and control the humidity of the small space (Pic. 3). Initially thought of fabricating class doors with hinges but discovered it was way too expensive. A much cheaper alternative was to use a large piece of clear acrylic with Velcro tape to hold it in place. The Velcro also provided an adequate seal to prevent outside air from entering the area. (Turning off dehumidifier, takes 4-5 hrs for humidity to equalise with outside air) The neck slots were basically slots cut into a flat acrylic sheet. A folded Ikea fleece blanket was perfect for the guitars to sit on and cost only $5 (Pic. 4).
Pic. 3
Pic. 4
Choice of Dehumidifier:
Now that the cabinet is sealed, I proceeded with the humidity control. I tried the smallest dehumidifier I could find from Courts. It is a 230w dehumidifiers with a compressor (Pic 5). Big mistake. Although the unit could bring the humidity down to as low as 40% in less than 5 mins, the temperature inside rocketed past 36 degrees! Furthermore, once the target humidity is reached, the unit shuts down and humidity flew to upwards of 75%! This I realised was due to the big condenser fins which still had lots of residue condensed water left on it that would then evaporate back into the air. High temperatures, fluctuating humidity and a 230w electricity bill is a big no no. Thanks to courts return policy, I was able to bring it back for a full refund.
Pic. 5
What I found next after some research is the Peltier effect type of dehumidifier. Though small and less efficient than conventional compressor dehumidifiers, it was perfect for small enclosed spaces. This particular “petite dehumidifier” (Pic.6) can be bought from Homefix for $99 or from the agent for slightly less. With a 23w power consumption, it will cost less than $20 to run it 24hrs for a month. It is near silent and keeps the humidity in the cabinet between 47-51%. Temperature never exceeds 31 degrees as well. Trying to save more electricity, I used an electricity timer to on and off the unit in 1 hr intervals and was still able to control the humidity between 49-51%. In other words the unit now runs 12 hrs a day. Was thinking my last resort was to put 6 x Hippos in there, but never had a chance to test it that works.
Pic. 6
It’s been a month and my strings are still in near new condition and my acoustics seem to sound much better than when they were wet. Im pretty pleased with this current setup now. Pic. 4 is how it looks right now.
Only problem left is the neck slots are kind of sharp and might scratch the necks in the long run. Does anybody know where I could get rubber or silicon tubes I could place around the slots??
The breakdown of costs is as follows:
Acrylic cover - $65
Slots - $70 (Couldn’t find a place that does it in SG, went Malaysia, think I got cheated)
Fleece Blanket - $5
Dehumidifier - $99 (At Homefix)
Hygrometer - $25
About $250, not bad to keep 9 guitars in an always playable condition.
Let me know what you guys think, and feel free to ask me questions and criticise my work.
Thanks for looking,
Leon
")
